Thursday, March 31, 2011

Time In The Garden


Well hello there! At four weeks old, we've officially reached the teenage years for these little ladies. Curious, jumpy, and rowdy as ever. From left to right: the edge of Barney, Athena towards the back, and LeLu up front. 


This picture is from today's outdoor play time. Little Barney is in the rear. Oh my, are they growing like weeds!


In between baking and chick rearing, I had a chance to snap off a few shots of the first generation flock. Our sweet layers.


I love this shot; all five of them make an appearance! Left to right: Blanca, Chatty Cathy, Inara peeking from behind, Starbuck, and finally the edge of Ramona.


Over spring break we managed to do some yard work, moving the old chicken tractor, and beginning construction on a new one. Am happy to report the shallots and garlic are springing up.


One of my favorite gifts, an adorable little rose bush, is making a wonderful comeback. It's been amazing to watch everything start to return to life after such a cold winter.


It's definitely time to take a few moments out for the simple pleasures. For instance, working in the soil and earth for a few days.

I love spring anywhere, but if I could choose I would always greet it in a garden.  ~Ruth Stout

Wednesday, March 30, 2011

My Favorite Pasty


 I said pasty...not pastie. There is a difference.


One hides your tender parts and one is a delicious flaky pie filled with goodness. Obviously I think we know which one I'm speaking of.


I've been lucky enough to know the owners of Cousin Jack's Pasty Company since it's infancy (even spent a short while as one of their roommates). And out of all of my favorite local eatery companies, Cousin Jack's just may be my favorite.


Being a vegetarian, I love that Cousin Jack's offers a wide variety of pasty selections: wild mushroom, harvest vegetable, broccoli and cheese...hell there is even a fruit filled one. For the meat lovers they offer pesto lamb, steak and ale (made with Ninkasi brew), and a few other delicious flavors. Currently, I'm in love with the wild mushroom pasty served with a trio of different mustards. Mouth-watering goodness here!


Word out on the street is that a food cart is in the near future for these guys. That means I can get my pasty fix more often!


As it is now, you can order a case directly from them or buy them in your local store by the two-pack (check out their listing of where to buy). If you are out and about in the Whit, stop by their warehouse and pick up a few pasties directly from Dave & Kim. It's easy as pie (hehe). You can thank me later for suggesting it.

Wednesday, March 23, 2011

Classic Banana Bundt Cake


The bundt cake. Brilliant invention. The guy who made the bundt pan made millions. Hopefully he was a sweeter man for it (ha, sorry another bad pun).


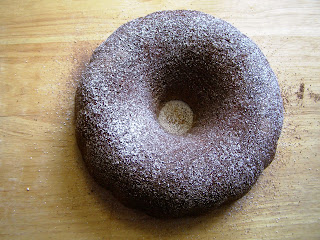
For me, the bundt cake is the epitome of easy baking. Make the batter, pour in the pan, bake and let cool. Add a topping as desired or take the simple route with a dusting of powdered sugar or cocoa powder. Or in my case, both. My changes - adding some brown sugar to make the outside ever so slightly crisp, adding almond extract, going with non-fat vanilla yogurt. There is lots of room in this recipe to add your favorite addition like chocolate chips, peanut butter chips, a flavored yogurt, or other tid bits of goodness. Enjoy!

Classic Banana Bundt Cake
Adapted From: Food Librarian
  • 3 cups all-purpose flour
  • 2 teaspoons baking soda
  • 1/2 teaspoon salt
  • 2 sticks unsalted butter, at room temperature
  • 1 1/2 cups white sugar
  • 1/2 cup brown sugar 
  • 2 teaspoons pure vanilla extract
  • 1/2 teaspoons almond extract 
  • 2 large eggs, at room temperature
  • About 4 very ripe bananas, mashed (you should have 1 1/2 - 1 3/4 cups)
  • 1 cup vanilla non-fat yogurt
Center a rack in the oven and preheat to 350 degrees F. Generously butter a 9- to 10-inch (12 cup) Bundt pan. (If you use a silicone Bundt pan there’s no need to butter it). I used a ton of PAM like spray. Don’t place the pan on a baking sheet - you want the oven’s heat to circulate through the Bundt’s inner tube.

Whisk the flour, baking soda and salt together.

Working with a stand mixer, preferably fitted with a paddle attachment, or with a hand mixer in a large bowl, beat the butter until creamy. This takes a few minutes, scrape down the sides as you need. Add the sugar and beat at medium speed until pale and fluffy. Beat in the vanilla and almond extracts, then add the eggs one at a time, beating for about 1 minute after each egg goes in. Reduce the mixer speed to low and mix in the bananas. Finally, mix in half the dry ingredients (don’t be disturbed when the batter curdles), all the sour cream and then the rest of the flour mixture. Scrape the batter into the pan, rap the pan on the counter to debubble the batter and smooth the top.

Bake for 65 to 75 minutes, or until a thin knife inserted deep into the center of the cake comes out clean. Check the cake after about 30 minutes - if it is browning too quickly, cover it loosely with a foil tent. Transfer the cake to a rack and cool for 10 minutes before unmolding onto the rack to cool to room temperature. Dust the top of the cake with cocoa powder and/or powdered sugar.

If you've got the time, wrap the cooled cake in plastic and allow it to sit on the counter overnight before serving - it's better the next day. You can also add your favorite icing to this. An easy one - orange juice and powdered sugar.

Tuesday, March 22, 2011

It's Spring! And My Wish List


Hi spring, welcome to the neighborhood. I've missed you ever so much. 


One of the first places the signs of spring abound is near the waterway that runs through our beautiful town, the Willamette River. Sadly, when I am out on the road I don't get to see much of this taking place.


Being self-employed (outside of the cooking realm) keeps me busier than I would like to admit. Last week was spent traveling and training, followed by a hellish day of attempting to battle airports and the friendly skies. Anyone who flew through SFO last Friday will sympathize here. To kill time and use free wi-fi, I often spend my layover hours browsing current recipe trends. When I am away from the oven, my mind fills with daydreams of baked goods and tasty treats. A few of my current wish list items include:
Be on the look out for my trial runs of any of the above. And my newest concoction - the cocktail cupcakes dozen pack!

Sunday, March 13, 2011

Baby Chicks!


Aren't they adorable? Please excuse the funny lighting, they reside in a red heat lamp environment until they get old enough.


It's official, we are now a multi-generational chicken household. Our original flock is about two years old while these little ones are only a few days old.


Meet Barney the barnevelder.


Athena the ameraucana, named after the Battlestar Galactica character.


And LeLu the dominique. Lelu was named after the namesake character from the Fifth Element. That makes four of our extended flock named for sci-fi characters (can you say uber dork?).


For the next few weeks, our make-shift brooder will be their new home. The tall one is in charge of building a smaller chicken tractor/coop until we can merge our two flocks into one, which will likely be a few months as the original flock needs to get used to the idea of the newer ladies.


I had planned to post all sorts of chick-rearing tips in this post, but hell the cuteness factor overtook me. Expect many more postings on the growing little ones soon!

Saturday, March 12, 2011

Easy Cilantro Walnut Pesto


Ever have that moment where you are standing in front of your fridge, craving something homemade, yet not wanting to make anything? This happens to me a lot. Especially when things around our little micro-urban farm are busy, work is piling up, etc. About a week ago I found myself in this position, with a bunch of fresh cilantro in hand and a bag of organic walnuts. After a few seconds of blank thoughts, it hit me - Cilantro Walnut Pesto!


Talk about an easy breezy recipe! Take cilantro, pesto, garlic, cheese, and walnuts, then blend in a food processor. Salt and pepper to taste. Toss with your favorite cooked pasta, in my case a wonderful wheat-alternative paste made of quinoa, and you have yourself an easy meal. Enjoy!

Easy Cilantro Walnut Pesto
Adapted from: Fabulous Cilantro Pesto
  • 1 (16 ounce) package of your favorite pasta
  • 1 bunch fresh cilantro
  • 5 cloves garlic, minced
  • 1 tablespoon white wine vinegar
  • 1/4 cup grated Parmesan cheese
  • 1/2 teaspoon red pepper flakes
  • 1/2 cup walnuts
  • salt to taste
  • 1/2 cup olive oil 
Bring a large pot of salted water to a boil. Add the pasta, and return water to a boil. Cook pasta for 8 to 10 minutes, or until al dente; drain well.

In an electric food processor or blender, blend cilantro, garlic, vinegar, Parmesan cheese, red pepper flakes, nuts, and salt. Add 1/4 cup of the olive oil, and blend the pesto. Add pepper to flavor. Add more olive oil until the pesto reaches your desired consistency. 


Pour pesto in a small saucepan and warm over low heat, stirring constantly, until pesto begins to simmer. Pour over cooked pasta and toss. Add your favorite vegetables, like mushrooms or artichoke hearts, and toss.

Tuesday, March 8, 2011

Easy Soft Pretzels


Last weekend marked the second round of the Beer Olympics! Needless to say, I didn't win anything other than a hangover. Boy oh boy, did we have a blast. Check out the scoreboard!


In order to combat the excessive amount of beer drinking, I opted to make soft pretzels for the Olympians. With time running out, I went the cheater's route and used pre-made store dough to make the soft pretzels. Taking a cue from Ms. Martha, I followed her recipe and discovered how simple it is to make homemade soft pretzels.


The hardest part for me was the actual pretzel knot tying. I couldn't follow Martha's instructions for the life of me, so I simply started making an assortment of knots, ties, and bows to see what would work best. Note to self for next time - make sure your knots and ties are solid or else they will come undone during the quick boil process (learned this the hard way).


All in all though, it was a very easy recipe and is going to make a comeback soon! Enjoy!

Easy Soft Pretzels
Adapted from: Soft Pretzels
  • 1-2 bags of pre-made pizza dough from the local store
  • 3-6 tbsp baking soda
  • oil for baking sheets
  • Coarse rock salt  
Roll out the dough into a rectangular shape. Cut dough into 12 pieces (per bag), and roll each into an 18-inch rope. I found that twirling the dough in the air helped.

Form a U shape with 1 rope, and twist ends together twice. Fold twisted portion backward along center of U shape to form a circle, then gently press ends of rope onto dough to seal. Or simply make your own twist/knot/tie. Transfer to an oiled baking sheet, and repeat. Let rise for 20 minutes.

Preheat oven to 475 degrees. Bring a large pot of water to a boil, and add baking soda. Boil pretzels in batches until puffed and slightly shiny, 1 to 2 minutes per side. Transfer to wire racks to drain. Sprinkle with the rock salt while still damp (this will help the salt stick).

Return to baking sheet and bake until golden brown and cooked through, about 15 minutes. Pretzels will keep, uncovered, at room temperature for up to 12 hours. Rewarm in a 250-degree oven if desired, and serve with mustards.

Monday, March 7, 2011

Homemade Yumm Bowls


If you live in Oregon, you've likely discovered Cafe Yumm. Therefore, discovering Yumm Sauce. This, my friends, is a little jar of magic. Put it on anything, ANYTHING, and taste the rainbow of flavors.


I literally have friends who have this stuff shipped across the country to eat. And it's worth every penny.


On a rainy day, I bet you most Oregonians contemplate having or making a Yumm bowl. While the restaurants serve delicious bowls, I prefer to make my own with all of my favorite ingredients. The concept is simple. Start with a bed of cooked rice and some type of beans, add your favorite fresh veggies and condiments, top with Yumm Sauce and presto - homemade yumm bowl!!  Listed below are the steps for one of my staple meals. Enjoy!

Homemade Yumm Bowls
  • 3 cups cooked white rice (basmati, jasmin)
  • 1 jar Cafe Yumm sauce
  • 1 can black beans, rinsed 
  • 1 small can sliced black olives, rinsed 
  • 1/3 bunch cilantro, chopped
  • 1 tomato, chopped
  • 1 avocado, sliced 
  • 1 container fresh or store-bought salsa 
  • 1 container sour cream 
  • 1-2 large mushrooms, sliced 
  • 1/4 head red cabbage, diced 
  • Shredded cheese of your choice
  • *nice additions: shredded carrot, cucumber, tortilla chips, field greens, brown rice, quinoa 
Start with your rice and beans, adding equal amounts to the bottom of the bowl. Next add the other various items you've selected (veggies, etc.). Finish with your Yumm Sauce, salsa, cheese, etc. VoilĂ - delicious Yumm bowl!